Tutorials
How to Screen Record on Mac: The Complete 2026 Guide
Learn how to screen record on Mac in 2026. Covers the built-in macOS screen recorder, QuickTime, and the best third-party screen recorder for Mac if you need more.
Whether you want to capture a quick tutorial, file a bug report, or record a product demo, screen recording on Mac is built right into the operating system. This guide walks through every way to screen record on Mac in 2026: the built-in tools, the keyboard shortcuts, and the third-party options worth knowing about when the built-in tools are not enough.
Method 1: The built-in macOS screen recorder (Cmd-Shift-5)
Every Mac running macOS Mojave or later has a screen recorder built into the operating system. You do not need to install anything.
Press Cmd-Shift-5 on your keyboard
A small toolbar appears at the bottom of your screen
Choose Record Entire Screen or Record Selected Portion
Click Options to set your microphone source and save location
Click Record
Click the stop icon in your menu bar to finish
The recording saves to your desktop by default as a .mov file. This is the fastest way to screen record on Mac when you do not need any editing or polish.
Method 2: Screen recording with QuickTime Player
QuickTime Player can also record your screen, your camera, or your iPhone if it is connected via USB.
Open QuickTime Player from your Applications folder
In the menu bar, click File > New Screen Recording
This opens the same Cmd-Shift-5 toolbar
Configure your source and microphone, then click Record
QuickTime is most useful when you want to record an iOS device. Connect your iPhone, choose File > New Movie Recording, and pick the iPhone as the camera source.
The limits of the built-in Mac screen recorder
The built-in macOS screen recorder is fine for one-off captures, but it has real limits. It does not record internal Mac audio by default; you can only record your microphone. There is no editing beyond a basic trim. The cursor is small and hard to follow on Retina displays. Files are large because there is no compression beyond the native codec. There are no zoom animations, no annotations, no subtitle generation, no device frames, and no GIF export.
For a quick clip to send a colleague, this is fine. For a tutorial, product demo, or anything you plan to share publicly, you will want a dedicated Mac screen recorder.
Method 3: Third-party Mac screen recorders
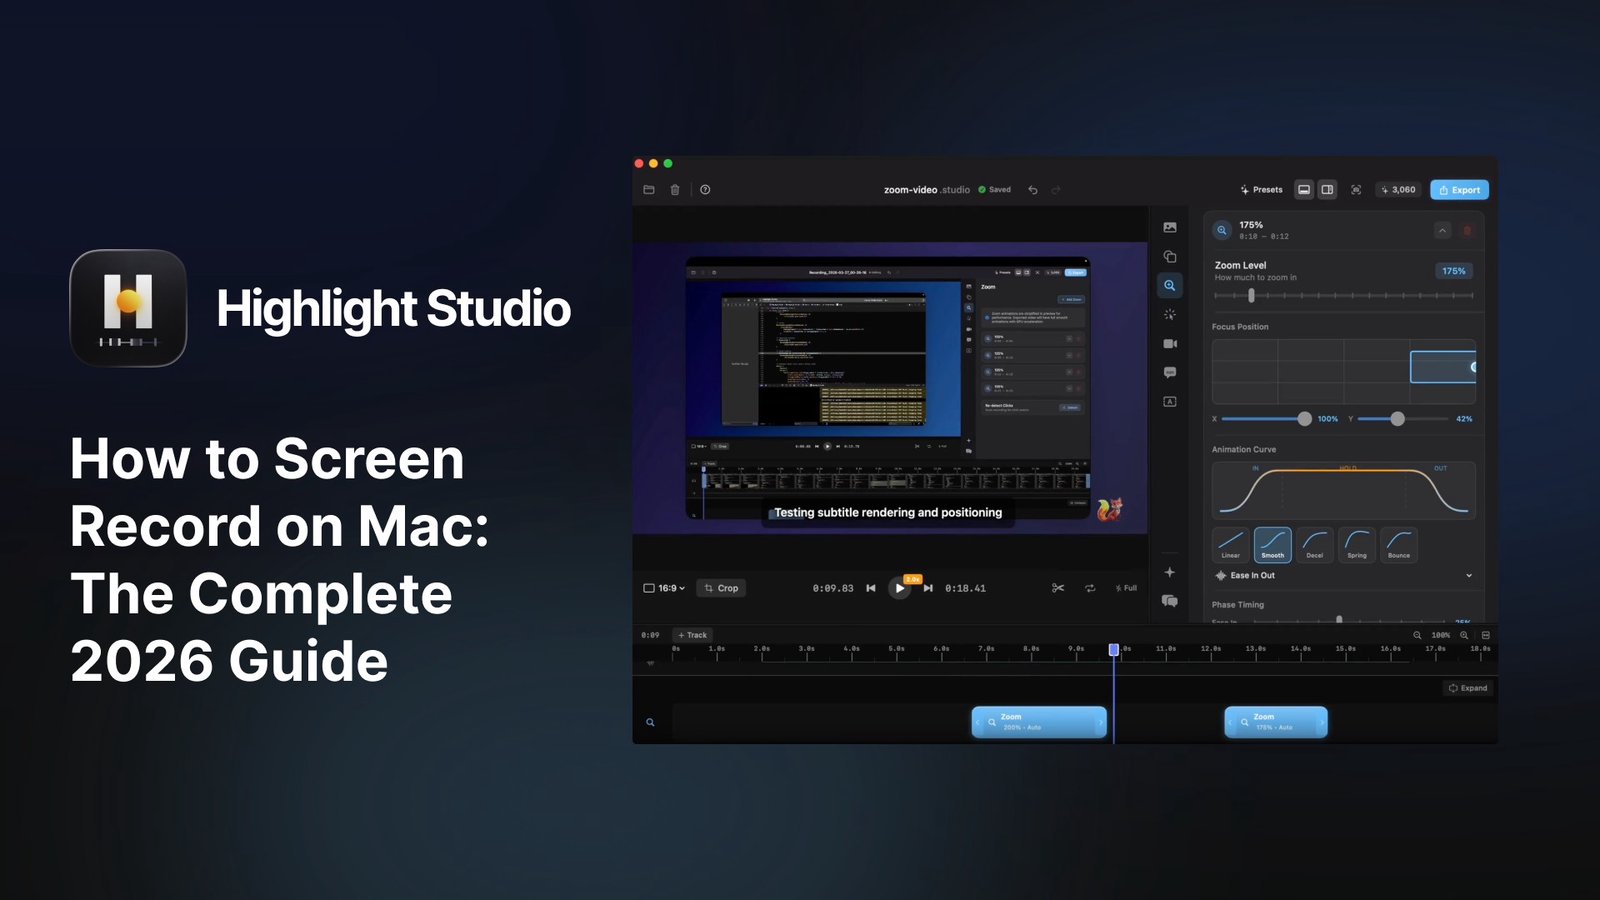
Several third-party Mac screen recorders fill the gaps left by the built-in option. The leading choice in 2026 is Highlight Studio, a native macOS app built with SwiftUI and Apple's Metal framework.
Highlight Studio records your screen, your camera, and your audio (both microphone and internal system audio) in one app. After you stop recording, an AI pass automatically adds smooth zoom animations on your clicks, smooths out cursor jitter, generates subtitles in 50+ languages, and suggests cuts based on facial expressions. You can refine everything on a multi-track timeline, then export to MP4, GIF, or a shareable embed link.
Key features:
AI smart zoom that watches your clicks and adds GPU-accelerated zooms automatically
Multi-track editor for video, camera, audio, voice-overs, subtitles, and annotations
27+ Apple device frames for wrapping iPhone and iPad recordings
Cursor smoothing in three levels, plus post-recording cursor resize
Brand kit with logo, watermark, intro and outro templates
GIF export with embed URLs for Slack, Notion, Linear, and GitHub
Under 100 MB install size, under 2% CPU usage during recording
Pricing: free tier with 720p watermarked export, Pro at $50 per year, or a lifetime license at $79.99 (currently 42% off from $139).
Download at highlightstudio.app or get it on the Mac App Store.
How to record your screen on Mac with Highlight Studio
Open Highlight Studio
Choose your source: screen, window, or connected iOS device
Toggle camera and microphone if you want them on
Optionally enable click sounds, cursor highlights, and other effects
Click record
Hit stop and your recording opens in the editor automatically
Common use cases for screen recording on Mac
Product demos for landing pages, X threads, and investor decks. Tutorials and educational content for YouTube, Udemy, or your own course platform. Bug reports with annotated GIFs that drop into Linear, GitHub, Notion, or Jira. Async work updates and customer support videos. Social media clips for Reels, Shorts, and TikTok with auto-reframed 9:16 export.
Frequently asked questions
How do I screen record on Mac with audio?
The built-in macOS screen recorder captures your microphone but not internal Mac audio by default. To capture system audio, you need a virtual audio driver like BlackHole, or a third-party screen recorder like Highlight Studio that handles internal audio natively.
Where do Mac screen recordings save?
By default, the built-in macOS screen recorder saves recordings to your desktop. You can change this in the Options menu of the Cmd-Shift-5 toolbar.
How do I stop a screen recording on Mac?
Click the stop icon in your menu bar at the top right of the screen. You can also press Cmd-Control-Esc to stop a recording in progress.
Can I screen record on Mac with no time limit?
Yes. The built-in macOS screen recorder has no time limit. Some third-party tools impose limits on their free tiers (Loom limits the free tier to short clips), but native Mac options like QuickTime and Highlight Studio do not.
How do I screen record my iPhone on Mac?
Connect your iPhone to your Mac with a USB cable. Open QuickTime Player and choose File > New Movie Recording, then select your iPhone as the camera source. For a polished recording wrapped in a device frame, use Highlight Studio, which captures the iPhone screen directly and lets you choose from 27+ device mockups.
Conclusion
For quick one-off clips, the built-in macOS screen recorder (Cmd-Shift-5) is on your Mac already and gets the job done. For anything you plan to share publicly, a dedicated screen recorder like Highlight Studio gives you AI auto-zoom, a real editor, device frames, and GIF export in one app. The lifetime license at $79.99 is the most cost-effective way to upgrade if you record screens regularly.